Metal beds look simple, but every welded joint carries practical responsibility. A loose corner can create movement, noise, sharp edges, or eventual frame failure. Therefore, learning how to check the welding quality of metal beds requires more than judging a smooth-looking bead.
Recent furniture market reports from Grand View Research and Fortune Business Insights highlight durability, safety, and long service life as major purchasing factors. However, market demand does not prove manufacturing quality. The American Welding Society emphasizes controlled procedures, qualified operators, suitable materials, and effective inspection. ISO 5817 also provides useful guidance for evaluating weld imperfections, including cracks, undercut, porosity, overlap, and incomplete fusion. These standards support a disciplined inspection process, even though household bed frames are not identical to structural steel assemblies.
Look closely.
Dr. Duane K. Miller, a recognized welding engineer, states, “Quality cannot be inspected into a weld; it must be built into the process.” This principle applies directly to metal beds. Begin with bright, even lighting and inspect every visible joint, especially corner connections and support brackets. A sound weld should show consistent width, proper fusion, and no visible cracking or deep pinholes. Lightly pressing the frame can reveal unusual movement, but this simple test cannot replace professional inspection. That limitation matters. A neat surface may hide internal weakness. This guide examines practical visual checks, basic loading observations, dimensional accuracy, surface defects, and warning signs that justify rejection or further testing.
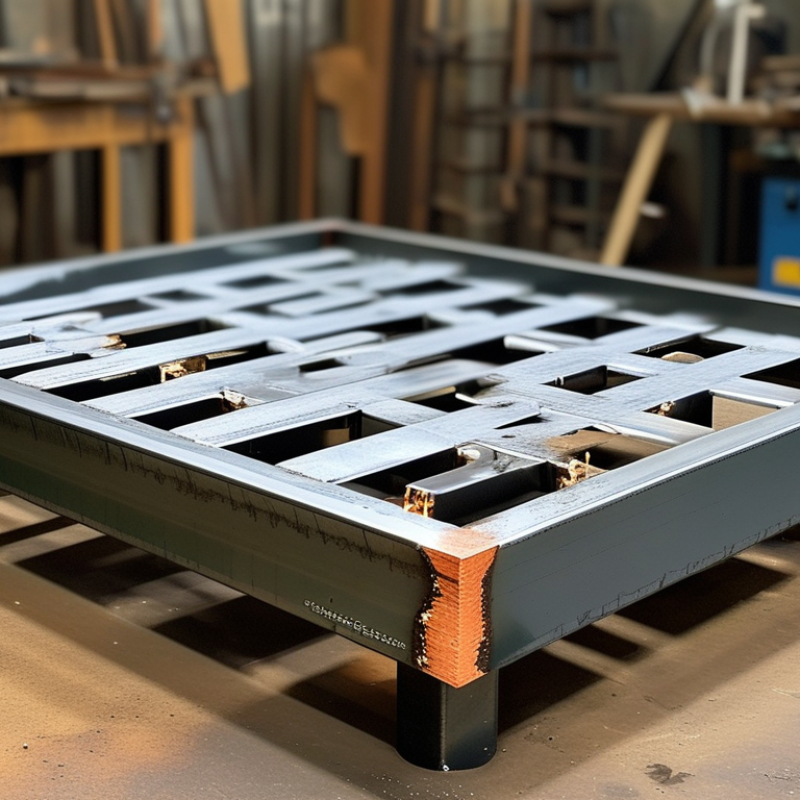
Check the Bed Frame, Materials, and Welded Joint Preparation
A reliable metal bed inspection starts with the frame, not the paint. Measure both diagonals; a difference above 3 millimeters may indicate twisting in a queen-size frame. Check every corner on a flat surface. Rocking often reveals poor fit-up before welding defects become visible. Industry guidance in AWS D1.1/D1.1M emphasizes joint alignment, weld size, and approved acceptance criteria rather than appearance alone.
Material verification matters. Compare the steel grade, thickness, and mill certificate with the design specification. Thin tubing can burn through when heat input is uncontrolled. Excessive heat can also distort long side rails. ISO 5817:2023 divides weld quality into levels B, C, and D, with Level B being the most demanding. Select the required level before production, not after a complaint. A magnetic particle or dye penetrant test can expose surface cracks that paint may hide. Visual inspection still catches undercut, overlap, spatter, and incomplete fusion.
Joint preparation deserves close attention. Remove oil, rust, scale, and moisture from contact surfaces. Keep the root gap consistent with the welding procedure. Tack welds should hold the frame square without pulling the rails inward. Inspectors should record weld length, leg size, and defect location with photographs. The American Welding Society recommends qualified procedures and trained personnel for structural weld control. Still, records can be incomplete. I would recheck measurements after cooling, because a warm frame can appear square and shift later.
Inspect Weld Appearance, Consistency, and Surface Defects
2026 Top Guide: How to Check Welding Quality in Metal Beds?
During a practical metal bed inspection, examine each weld under bright, direct lighting. A sound weld usually has a smooth profile, even width, and steady edges. Look for cracks, pinholes, excessive spatter, overlap, and undercutting along the joint. These details matter most around legs, frame corners, and support bars. A neat bead can still hide weak fusion, so appearance alone is not proof of strength.
Consistency reveals control.
Compare weld length, bead height, and spacing across similar joints. Uneven beads may indicate unstable speed, poor preparation, or changing heat input. Check both sides of visible connections when possible. Before painting, remove loose slag and inspect the bare surface carefully. Coating can hide small defects. I have found that rushed checks often miss tiny pores near corners. That mistake deserves attention.
Tips:
Use a flashlight at a low angle. Run a clean finger nearby, not across sharp metal. Measure critical welds with a fillet gauge. Record unusual areas with clear photos. If a crack appears, stop relying on appearance and request a qualified technical evaluation. Even experienced inspectors can overlook defects when lighting or access is poor.
Test Weld Strength, Stability, and Resistance to Movement
How to Check Welding Quality in Metal Beds
A reliable metal bed needs welds that resist pulling, twisting, and repeated movement. In practical inspections, I check every joint under light pressure before using instruments. A weld can look neat and still be weak. Look for continuous beads, even width, and smooth transitions between the tube and joint. Cracks, pinholes, undercut edges, or dark burn marks require closer inspection. Clean the surface first, because paint can hide small defects.
Test weld strength by applying gradual force near each connection. Do not jerk the frame. A sound joint should remain firm without clicking, opening, or producing visible gaps. Assemble the bed on a level floor, then press each corner and the center rail. The frame should stay stable. If one leg lifts repeatedly, the structure may be twisted or poorly aligned. Move the bed sideways and lengthwise to test resistance to movement. Excessive rocking often points to loose fasteners, uneven feet, or weak weld placement. My judgment is not always perfect, so a failed visual check should lead to professional inspection.
Tips: Use a rubber mallet for gentle impact testing. Listen for dull, solid sounds rather than sharp rattling. Recheck joints after several movement cycles. Inspect hidden welds beneath rails and brackets. Keep notes and photographs, since small changes can reveal developing weakness.
Measure Joint Alignment, Dimensions, and Frame Squareness
Checking welding quality in a metal bed starts with joint alignment, not surface appearance. A clean bead can still hide a twisted frame or poor fit-up. I usually place the bed on a flat inspection table and check each welded joint with a straightedge. The members should meet evenly, without visible gaps or sudden steps. Do not trust appearance alone.
Measure the frame length, width, rail height, and leg position with a steel tape and caliper. Compare every result with the approved drawing or production tolerance. Measure both diagonals across the bed frame. If the diagonal lengths differ, the frame is not square. A difference of only a few millimeters can make assembly difficult. Mark each reading clearly. Recheck unusual results.
For practical verification, clamp one corner and measure the opposite corner. Then reverse the setup and repeat the test. This helps identify measurement error or a flexible frame. I have seen a frame pass a quick visual check but rock on the floor because one leg was slightly short. The error was small, yet the defect was obvious in use. Check the weld area for undercut, cracks, incomplete fusion, and excessive spatter. A weld gauge and inspection light improve consistency. Some judgments remain difficult without non-destructive testing, especially when the joint is painted or inaccessible. Record photos, measurements, and corrections before final approval.
2026 Top Guide How to Check Welding Quality in Metal Beds? - Measure Joint Alignment, Dimensions, and Frame Squareness
| No. |
Inspection Dimension |
Recommended Check Method |
Typical Acceptance Criterion |
Target / Tolerance |
Sample Reading |
Result |
| 1 |
Joint alignment |
Place a straightedge across the welded members and measure any step or offset with a feeler gauge or digital caliper. |
Members are flush, with no sharp projection that could affect assembly, mattress support, or user safety. |
≤ 1.0 mm offset |
0.6 mm |
Pass |
| 2 |
Overall bed length |
Measure from the outermost end of the head-side frame to the outermost end of the foot-side frame using a calibrated steel tape. |
Finished dimensions must match the approved drawing and allow the intended mattress size to fit correctly. |
2,000 ± 3 mm |
2,001 mm |
Pass |
| 3 |
Overall bed width |
Measure at the head, center, and foot sections; record the largest deviation from the specified width. |
The frame remains within the dimensional tolerance and does not interfere with the mattress or bedding. |
1,000 ± 3 mm |
999 mm |
Pass |
| 4 |
Frame squareness |
Measure both diagonal distances across the rectangular frame with a tape measure and compare the readings. |
Equal diagonals confirm that the frame is square and will assemble without twisting. |
Difference ≤ 3 mm |
2 mm |
Pass |
| 5 |
Leg and support alignment |
Place the bed on a flat reference surface and check that all legs or support feet contact evenly. |
No rocking is permitted under light hand pressure; support points must remain stable. |
Rocking ≤ 1 mm |
0.5 mm |
Pass |
| 6 |
Weld bead continuity |
Visually inspect the complete weld length after cleaning; compare intermittent welds with the approved drawing. |
No unintended gaps, burn-through, crater cracks, excessive undercut, or incomplete weld segments. |
100% specified length |
Continuous |
Pass |
| 7 |
Weld profile and size |
Use a fillet-weld gauge to measure leg length or throat size at the start, middle, and end of representative joints. |
The weld meets the drawing requirement without excessive convexity, concavity, spatter, or sharp transitions. |
4.0 mm minimum leg |
4.2 mm |
Pass |
| 8 |
Surface defects |
Clean the weld and inspect under adequate lighting; use magnification when a surface indication is unclear. |
No visible cracks, open pores, exposed sharp edges, lack of fusion indications, or hazardous spatter. |
Zero cracks |
No defects |
Pass |
| 9 |
Weld distortion |
Check the top frame on a flat surface and measure the maximum gap beneath the frame with feeler gauges. |
Heat distortion must not prevent stable support or correct installation of slats and hardware. |
Gap ≤ 2 mm |
1.2 mm |
Pass |
| 10 |
Load stability after welding |
Apply the specified static load gradually to the assembled bed and inspect joints, legs, and connections for movement or cracking. |
No weld cracking, permanent deformation, joint separation, or loss of stability after the test. |
Test load: 1,000 N |
1,000 N; stable |
Pass |
Inspection note: Measurements should be taken with calibrated tools on cleaned welds and compared with the approved product drawing, welding procedure, and applicable safety requirements. The sample readings shown are illustrative quality-control results for a metal bed frame.
Verify Safety Standards, Load Capacity, and Quality Records
A reliable metal-bed inspection starts with the weld, not the paint. Check joint preparation, penetration, undercut, cracks, porosity, and incomplete fusion. A smooth bead can still hide a weak connection. ISO 5817 classifies weld imperfections into quality levels B, C, and D, with Level B representing the strictest requirements. For load-bearing joints, request the specified acceptance level in writing. Do not accept “looks strong” as a test result.
Load capacity needs evidence. Ask for the design load, safety factor, and test method used for the frame, legs, and center supports. EN 1725 addresses safety, strength, and durability for domestic beds and bed bases. Compare its test requirements with the supplier’s structural calculations and laboratory results. A practical check includes tightening fasteners, measuring frame deflection, and inspecting welds after repeated loading. One overlooked center rail can change the whole result.
Quality records reveal process control. ISO 3834 divides welding quality requirements into comprehensive, standard, and elementary levels. Request welder qualification records, material certificates, welding procedure specifications, inspection reports, and corrective-action logs. Photos help, but they are not traceability. Records should identify the batch, inspector, date, and failed points. I would still sample finished units independently. Paperwork can be complete while production quality remains uneven.
Conclusion
Checking the welding quality of metal beds requires a systematic review from the frame structure to the final quality records. Start by examining the bed frame materials, connection points, and joint preparation to confirm that surfaces are clean, properly fitted, and suitable for welding. Inspect each welded joint for uniform bead shape, consistent width, smooth transitions, and visible defects such as cracks, pores, undercutting, spatter, or incomplete fusion. The keyword how to check the welding quality of metal beds involves looking beyond appearance and evaluating practical performance.
Next, test the bed’s strength, stability, and resistance to movement under appropriate loads. Measure joint alignment, key dimensions, and frame squareness to identify distortion or assembly errors. Finally, verify that the finished bed meets applicable safety requirements, stated load capacity, and internal inspection procedures. Complete and accurate quality records should document materials, welding checks, test results, corrections, and final approval, helping ensure the bed is durable, safe, and consistently manufactured.

 Rimkok Furniture